Overview of Managed Identity for Power Platform Plug-Ins
Recently, a new preview feature was introduced in Dataverse, allowing connections from a Plug-In to Azure resources without using credentials. This feature simplifies authentication and enhances security when calling Azure Services from a Plug-In.
This post will guide you through the required setup and demonstrate how to access Azure Key Vault.
Implementing the Plug-In
To get started, I’ve implemented the plug-in with the basic pac plugin init template. In this example, I am using early-bound types. Additionally, I’ve created a Custom API with two input parameters (vault name and secret key) and one output parameter (secret value).
We initialize the ManagedIdentityService in the base class using the service provider:
this.ManagedIdentityService = serviceProvider.Get<IManagedIdentityService>();Using this service, we can acquire a token, granting access to the specified Azure resources. Remember to update the scopes list if you need access to other resources like Azure Storage.
protected override void ExecuteDataversePlugin(ILocalPluginContext localPluginContext)
{
    try
    {
        var scopes = new List<string> { "https://vault.azure.net/.default" };
        localPluginContext.Trace("Acquiring token");
        var token = localPluginContext.ManagedIdentityService.AcquireToken(scopes);
        var secretRequest = new odx_getkeyvaultsecretRequest() { Parameters = localPluginContext.PluginExecutionContext.InputParameters };

        var response = GetSecretValue(token, secretRequest, localPluginContext);
        localPluginContext.PluginExecutionContext.OutputParameters[nameof(odx_getkeyvaultsecretResponse.Value)] = response.Value;
    }
    catch (Exception ex)
    {
        localPluginContext.TracingService.Trace(ex.Message);
        throw new InvalidPluginExecutionException(ex.Message);
    }
}
We can retrieve a secret from Key Vault using the REST API. As parameters, we pass the acquired token, the vault name, and the secret name.
private static KeyVaultResponse GetSecretValue(string token, odx_getkeyvaultsecretRequest secretRequest, ILocalPluginContext localPluginContext)
{
    using (var client = new HttpClient())
    {
        client.DefaultRequestHeaders.Authorization = new AuthenticationHeaderValue("Bearer", token);
        client.DefaultRequestHeaders.Accept.Add(new MediaTypeWithQualityHeaderValue("application/json"));
        var secretUrl = $"https://{secretRequest.KeyVault}.vault.azure.net/secrets/{secretRequest.SecretName}?api-version=7.4";
        var request = new HttpRequestMessage(HttpMethod.Get, new Uri(secretUrl));
        var response = client.SendAsync(request).Result;
        string json = response.Content.ReadAsStringAsync().Result;
        localPluginContext.Trace($"Response: {json}");
        var keyVaultResponse = System.Text.Json.JsonSerializer.Deserialize<KeyVaultResponse>(json);

        return keyVaultResponse;
    }
}
Key Vault API documentation can be found here.
Sign assembly with a certificate
Before deploying the assembly to Power Platform, we must sign it with a certificate. For development purposes, a self-signed certificate is sufficient. Use the following PowerShell command to create a self-signed certificate (valid for one year by default):
New-SelfSignedCertificate -Type CodeSigningCert -Subject "CN=DemoIdentityAssembly" -CertStoreLocation "Cert:\CurrentUser\My"The certificate will be stored in the Current User store under the name 'DemoIdentityAssembly' (you can customize the name).
For production environments, consider using a certificate signed by a Certification Authority, as there are some limitations with self-signed certificates.
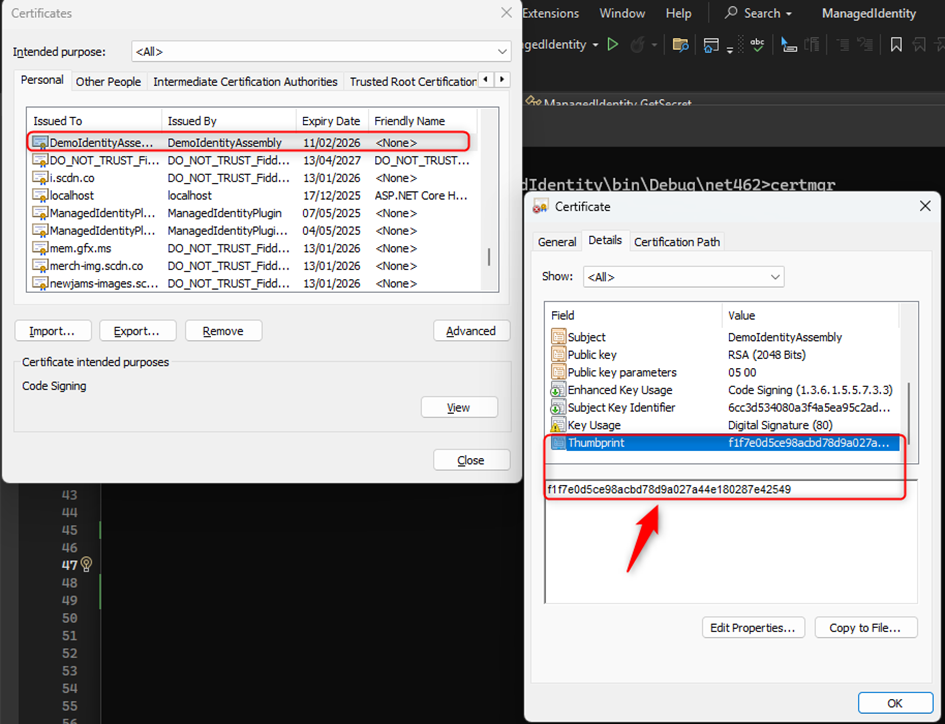
After creating the certificate, open certmgr application from the console to locate the new certificate. Copy its thumbprint, as it will be needed later when setting up Managed Identity in Azure.
Next, use the Visual Studio Developer Command Prompt to sign the new assembly, specifying either the certificate name or its SHA256 thumbprint.
signtool sign /n DemoIdentityAssembly /fd SHA256 ManagedIdentity.dllSet up Managed Identity in Azure
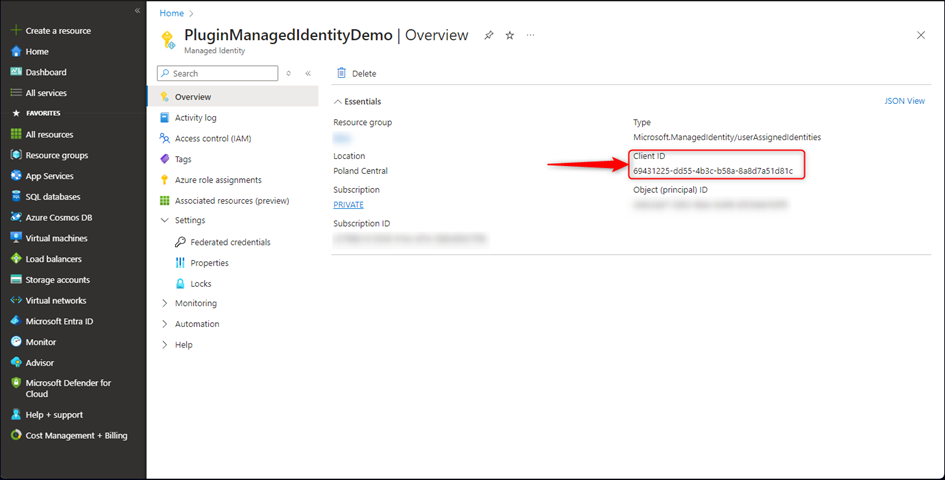
Let’s create a new User Assigned Managed Identity resource in Azure Portal.
After the new resource is created, we need to copy a Client ID, which will be used later.
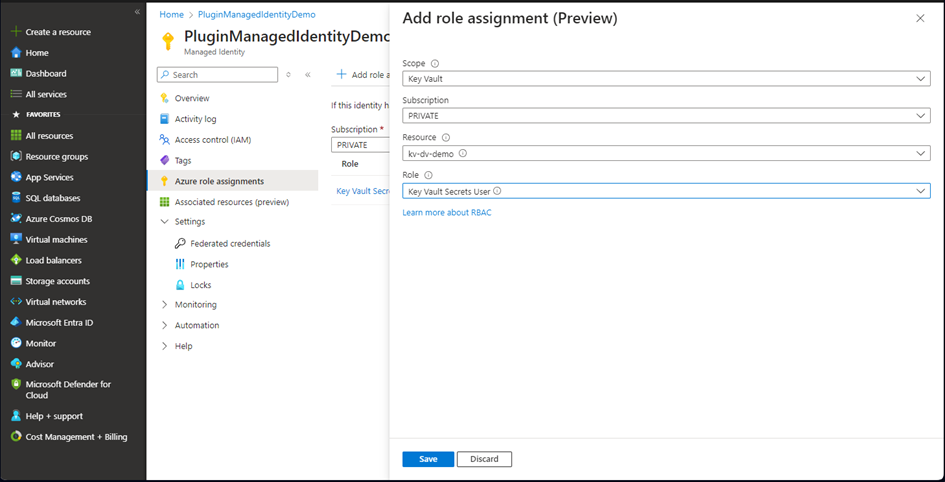
In Azure role assignments section, we have to assign access to particular resource. In our case it is Key Vault with Key Vault Secrets User role.
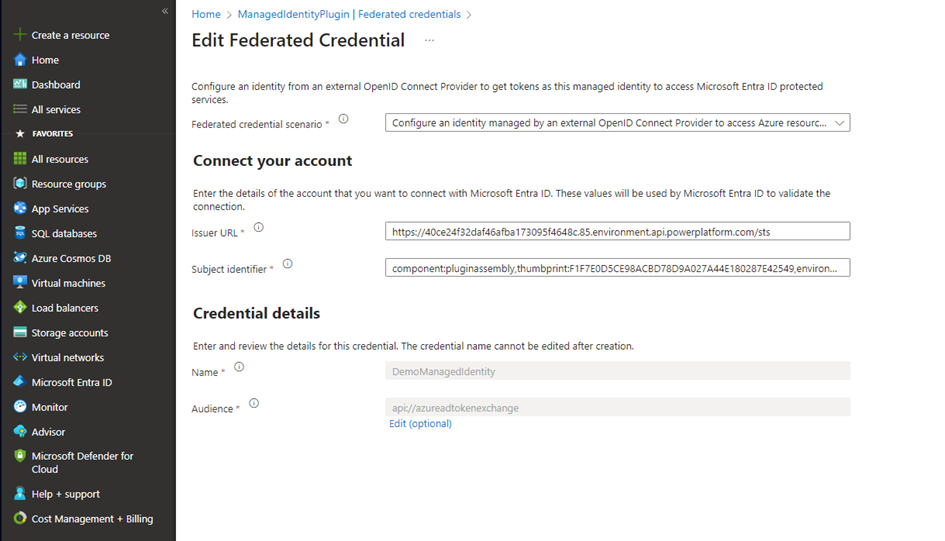
Last step on Azure side is to setup Federated credentials.
After selecting ‘Other’ scenario, following properties need to be populated.
Issuer URL – it is the URL of the token issuer, created based on following format:
|
https://[Environment ID Prefix].[Environment ID
Suffix].environment.api.powerplatform.com/sts |
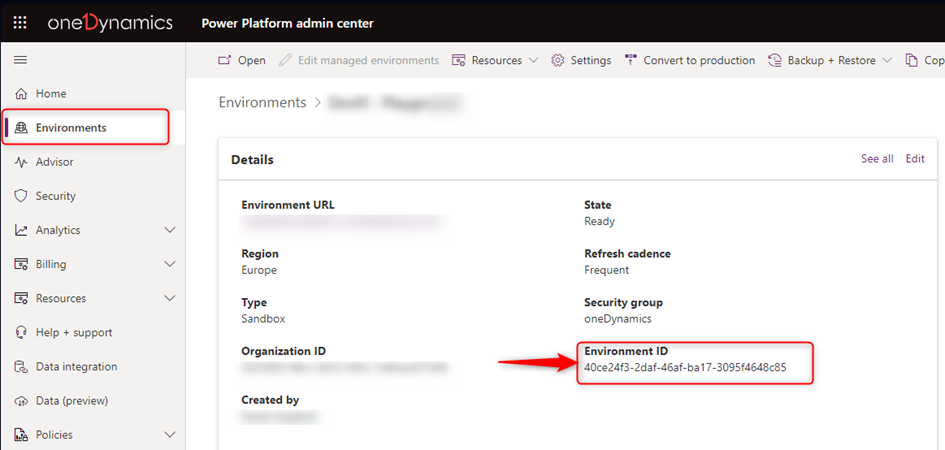
Where Environment ID Prefix is 30 first characters from environment’s identifier, which can be found in Admin Power Platform Portal. Suffix is last 2 characters. Please remember to remove dashes.
Subject identifier is created based on the following scheme:
|
component:pluginassembly,subject:<<certificateSubjectCommonName>>,issuer:<<issuerCommonName>>,environment:<<environmentId>> |
Or
|
component:pluginassembly,thumbprint:<<thumbprint>>,environment:<<environmentId>> |
Environment ID should contain dashes and thumbprint written with the upper case.
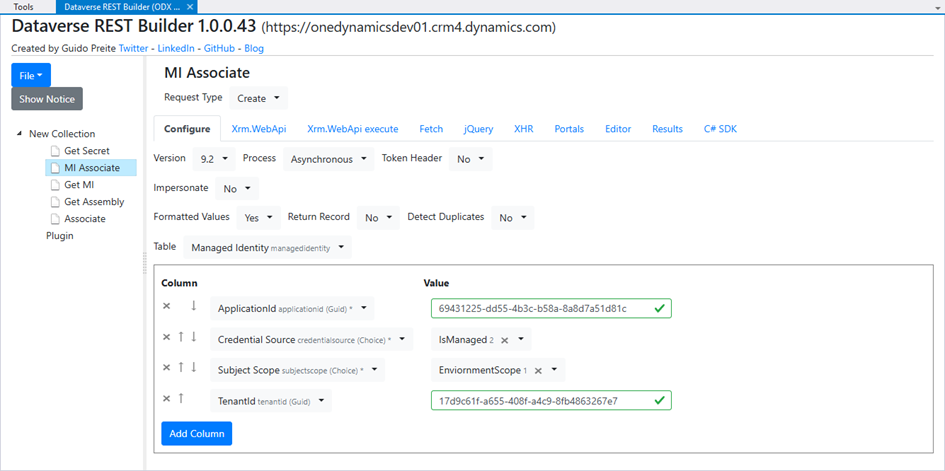
Registering the assembly
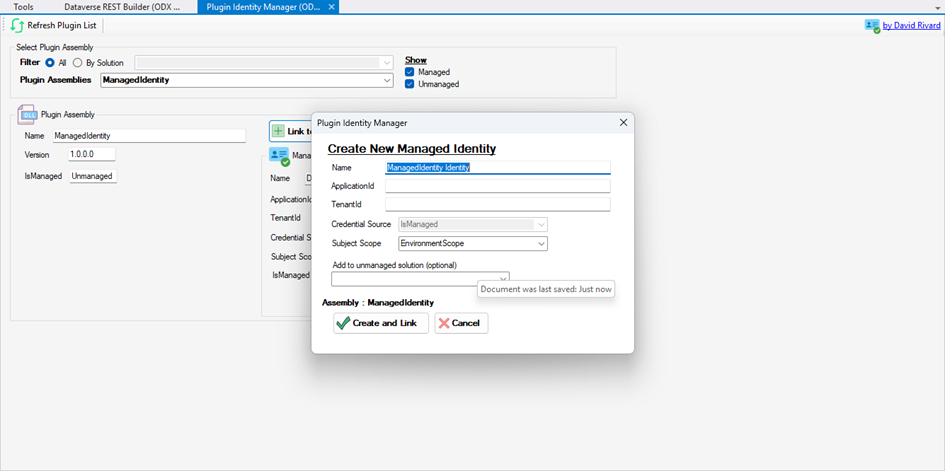
After registering the assembly and configuring the plug-in step, some additional actions are needed. A Managed Identity record needs to be provisioned. You can either use REST API to create such or use a tool in XrmToolBox called Plugin Identity Manager.
Link the new record to the existing assembly using a PATCH method with the updated managedidentityid lookup. However, if the assembly is not signed with a certificate, you may encounter the following error:
Plugin assembly must be signed with a valid certificate to use Managed Identity
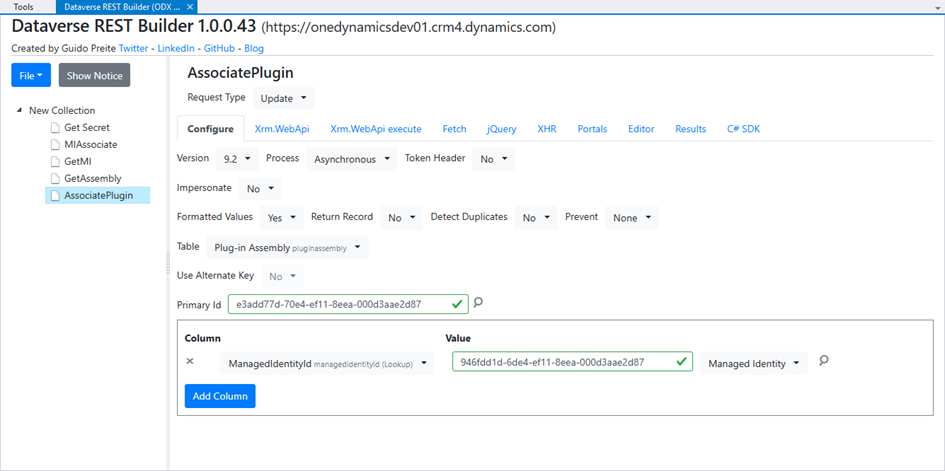
Alternatively, you can use the Plugin Identity Manager tool for this step:
Test the Plug-In
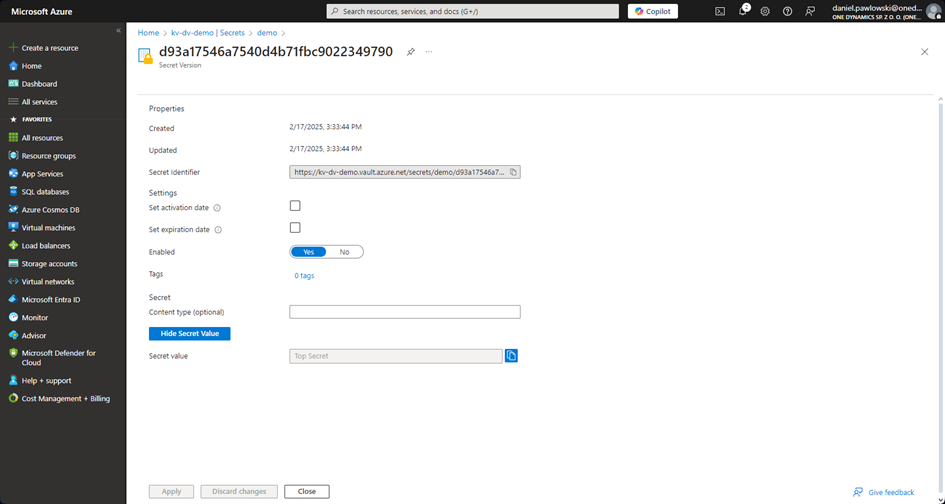
We have our Key Vault set up with the following secret:
Now, using Dataverse REST Builder, let's call the action that triggers the plug-in:
var parameters = {};
parameters.KeyVault = "kv-dv-demo";
parameters.SecretName = "demo";

fetch(Xrm.Utility.getGlobalContext().getClientUrl() + "/api/data/v9.2/odx_getkeyvaultsecret", {
	method: "POST",
	headers: {
		"OData-MaxVersion": "4.0",
		"OData-Version": "4.0",
		"Content-Type": "application/json; charset=utf-8",
		"Accept": "application/json"
	},
	body: JSON.stringify(parameters)
}).then(
	function success(response) {
		return response.json().then((json) => { if (response.ok) { return [response, json]; } else { throw json.error; } });
	}
).then(function (responseObjects) {
	var response = responseObjects[0];
	var responseBody = responseObjects[1];
	var result = responseBody;
	console.log(result);
	var value = result["Value"];
}).catch(function (error) {
	console.log(error.message);
});
If everything is set up correctly, the response should return the secret value:
{
  "@odata.context": "https://onedynamicsdev01.crm4.dynamics.com/api/data/v9.2/$metadata#Microsoft.Dynamics.CRM.odx_getkeyvaultsecretResponse",
  "Value": "Top Secret"
}
Summary
Setting up this feature involves multiple steps, with the most challenging part being certificate management. Despite being in preview, this feature shows great potential and offers significant benefits for enhancing security and simplifying authentication in Dataverse plug-ins.